
Textures
카테고리: Metal
Main Reference
- Metal by Tutorials - 4th edition
Texturing a Model: How to read texture in a fragment shaderUV coordinates: How to unwrap a meshAsset Catalog: How to organize texturesSamplers: Different ways to read a texturesMipmaps: Mutiple levels of detail
Loading the Texture
보통 하나의 mesh를 이루는 여러 submesh들은 같은 texture를 공유한다. 따라서 동일한 texture를 반복적으로 로딩하지 않기 위해 중앙에서 리소스를 관리하는 TextureController 객체를 통해 로딩한다.
static func loadTexture(texture: MDLTexture, name: String) -> MTLTexture? {
  if let texture = textures[name] {
    return texture
  }

  let textureLoader = MTKTextureLoader(device: Renderer.device)

  let textureLoaderOptions: [MTKTextureLoader.Option: Any] =
    [.origin: MTKTextureLoader.Origin.bottomLeft]

  let texture = try? textureLoader.newTexture(
    texture: texture,
    options: textureLoaderOptions)
  print("loaded texture from USD file")

  textures[name] = texture
  return texture
}
loadTexture method Model I/O Textrue(MDLTexture)를 받아서 MTLTexture 반환
[!note] Texture를 Load한다는 것은 CPU에 존재하는 원본 데이터(MDLTexture)를 GPU 메모리(MDLTexture)로 올린다는 의미
원래는 MTLTextureDescriptor 객체를 만들고 pixelFormat, dimensions, and usage 등 각 옵션을 하나하나 세팅하고 로딩해야 함. MTKTextureLoader를 이용하면 default 설정으로 편하게 불러오기 가능.
asset.loadTextures()
각 submesh들은 roughness, baseColor 등 개별적인 material characteristic을 가지고 있다. 따라서 Model I/O(MDL) 프레임워크는 모델 파일을 읽을 때 texture 파일의 픽셀 데이터를 직접 로드하는 것이 아니라, ==어떤 texture 파일을 어디에 어떻게 사용해야 하는지에 대한 레시피(MDLTexture Sampler) 정보==만 먼저 추출한다. MDLTextureSampler 안에는 주로 texture 이미지 파일 경로 정보가 들어있으며 이 정보가 객체에 담겨 각 submesh에 추가된다(MDLTextureSampler는 fragment shader에서 사용하는 MTLSampler와는 다른 개념). asset으로부터 필요한 texture 정보를 가져오고, 데이터를 로드하는 작업은 개발자의 역할이다.
struct Submesh {
  let indexCount: Int
  let indexType: MTLIndexType
  let indexBuffer: MTLBuffer
  let indexBufferOffset: Int

  struct Textures {
    var baseColor: MTLTexture?
  }

  var textures: Textures
}

extension Submesh {
  init(mdlSubmesh: MDLSubmesh, mtkSubmesh: MTKSubmesh) {
    indexCount = mtkSubmesh.indexCount
    indexType = mtkSubmesh.indexType
    indexBuffer = mtkSubmesh.indexBuffer.buffer
    indexBufferOffset = mtkSubmesh.indexBuffer.offset
    textures = Textures(material: mdlSubmesh.material)
  }
}

private extension Submesh.Textures {
  init(material: MDLMaterial?) {
    baseColor = material?.texture(type: .baseColor)
  }
}

private extension MDLMaterialProperty {
  var textureName: String {
    stringValue ?? UUID().uuidString
  }
}

private extension MDLMaterial {
  func texture(type semantic: MDLMaterialSemantic) -> MTLTexture? {
    if let property = property(with: semantic),
       property.type == .texture,
       let mdlTexture = property.textureSamplerValue?.texture {
      return TextureController.loadTexture(
        texture: mdlTexture,
        name: property.textureName)
    }
    return nil
  }
}
MDLMaterialProperty.textureName: MDLMaterialProperty에서 texture이름(보통 파일 경로) 반환. 만약 이름 정보가 없으면 UUID 반환MDLMaterial.property(with:): submesh의 MDLMaterial내에서 특정 semantic 찾기.- 참고) property type이 .texture인 경우 .MDLTextureSampler 프로퍼티가 존재
textures = Textures(material: mdlSubmesh.material)
위 과정을 거치면 MDLMaterial 객체로부터 바로 texture 뽑아올 수 있음
Passing the Loaded Texture to the Fragment Function
// Common.h (both CPU and GPU)
enum TextureIndices {
	baseColor = 0
};

// in CPU
extension TextureIndices {
	var index: Int {
		return Int(self.rawValue)
	}
}
추후에는 baseColor Texture 뿐만 아니라 여러 종류의 Texture를 사용해야 하기 때문에 enum으로 index를 관리하는 것이 좋다. 이때 CPU에서 index 연산 프로퍼티를 추가로 정의하면 Int(baseColor.rawValue)) 와 같은 코드 대신 baseColor.index 로 깔끔하게 접근이 가능하다.
// in CPU
encoder.setFragmentTexture(submesh.textures.baseColor, index: baseColor.index)

// in Shader
fragment float4 simpleFragment(
	VertexOut in [[stage_in]],
	texture2d<float> texture [[texture(albedo)]],
	sampler textureSampler [[sampler(albedo)]],
	constant struct CameraUniforms &cameraUniforms [[buffer(Camera)]]
) {
	float3 baseColor = baseColorTexture.sample(textureSampler, in.uv).rgb;
	// ...
}
Buffers, textures, and sampler states 등 Shader function이 사용하는 리소스들은 argument table에 index slot 형태로 담겨있다. CPU가 argument table 특정 slot에 리소스를 지정하면, GPU는 해당 테이블 index를 통해 리소스에 접근한다. 이때 buffer, texture, and sampler state table은 각각 별개의 table을 가진다. 구체적인 사용은 baseColorTexture.sample(textureSampler, in.uv) 와 같이 샘플러, uv 좌표를 통해 값을 얻어온다.
Asset Catalog
USD 포맷의 3D 모델을 로드하면 Texture를 포함해 import 할 수 있다. 하지만 다른 포맷의 파일인 경우 텍스처 리소스를 하나하나 구성해야 한다. Asset catalog는 이름 그대로 data, image, and texture 등 asset들을 간편하게 관리해주는 도구이다. 특히 Texture의 경우 색 영역, 사이즈별 압축, 리소스를 보낼 디바이스 관리 등 편리한 기능이 많다.
Texture vs Image? GPU 사용 여부 → 이 둘은 다른 종류의 asset으로 취급
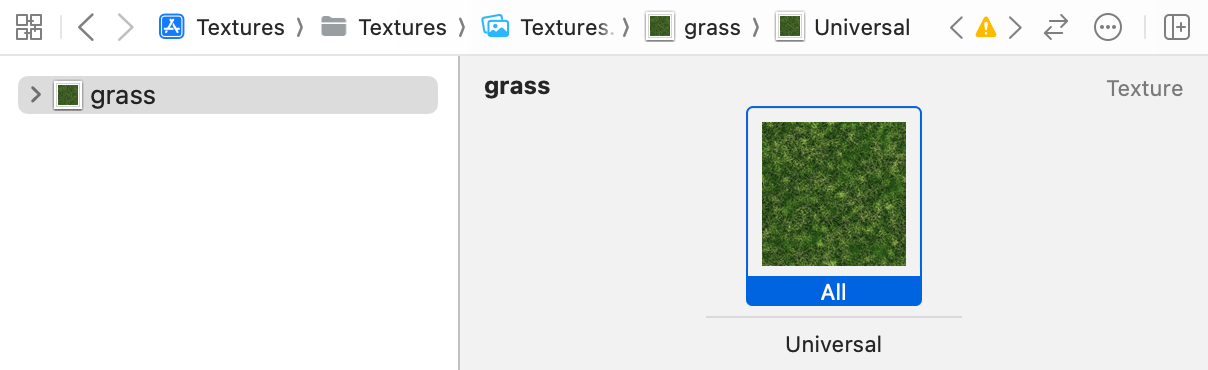
➤ Create a new file using the Asset Catalog template (found in the Resource section), and name it Textures. Remember to add it to the targets. ➤ With Textures.xcassets open, choose Editor ▸ Add New Asset ▸ AR and Textures ▸ Texture Set (or click the + at the bottom of the panel and choose AR and Textures ▸ Texture Set). ➤ Rename the new texture grass. ➤ Open the resources folder for this chapter, and drag ground.png to the Universal slot in your catalog. ➤ 주의) 반드시 Universal slot에 저장. 그냥 드래그하면 Texture가 아닌 Image로 인식.
static func loadTexture(name: String) -> MTLTexture? {
  if let texture = textures[name] {
    return texture
  }

  let textureLoader = MTKTextureLoader(device: Renderer.device)
  let texture: MTLTexture?
  texture = try? textureLoader.newTexture(
    name: name,
    scaleFactor: 1.0,
    bundle: Bundle.main,
    options: nil)

  if texture != nil {
    print("loaded texture: \(name)")
    textures[name] = texture
  }
  return texture
}
- 기존
loadTexture(texture: MDLTexture, name: String)함수와 유사하지만 MTKTextureLoader.newTexture(name, scaleFactor, bundle, options)부분이 다름- 지정한 bundle(폴더)의 Asset Catalog를 뒤져서 Texture 가져옴
Texture를 로딩할 때 특정한 옵션을 적용할 경우 [MTKTextureLoader.Option : Any] Dictionary 타입으로 전달한다. 주로 사용하는 옵션들은 다음과 같다.
.textureUsage.shaderRead: Fragment shader에서 Texture를 Sampling할 때 필요(대부분의 경우 사용).renderTarget: 이 텍스처에 렌더링 결과를 그려 넣을 때(Render-to-Texture) 필요합니다..shaderWrite: 컴퓨트 셰이더 등에서 텍스처에 직접 데이터를 쓸 때 필요합니다.
.textureStorageMode.private.shared.managed: CPU와 GPU 각각에 복사본을 유지하며 동기화
.originMTKTextureLoader.Origin.topLeft: 이미지 원본 그대로 로드(기본값) (v 대신 1.0-v 사용)MTKTextureLoader.Origin.bottomLeft: 이미지 데이터를 Metal Texture 좌표계로 변환
.generateMipmaps: Bool.srgb: Bool
sRGB Color Space
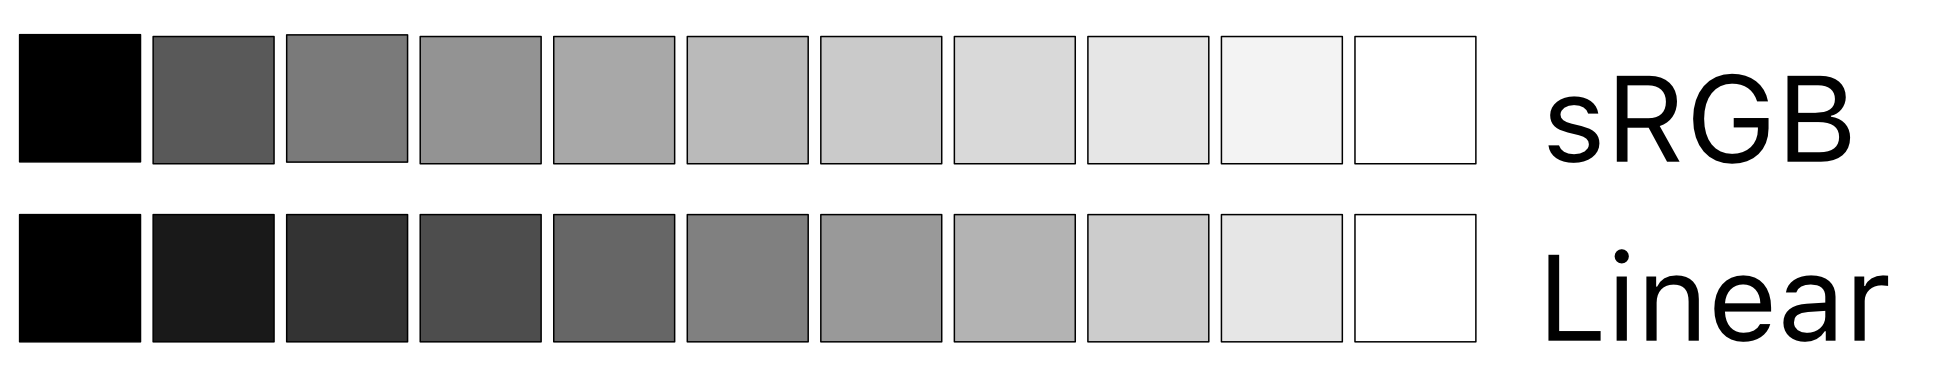
sRGB는 실제 모니터의 작동 방식과 인간의 눈에 보이는 색상 간의 균형을 맞춘 standard color format이다. 위 grayscale 예제를 보면 인간의 눈은 어두운 영역보다 밝은 영역을 더 잘 구별한다. 따라서 linear하게 색을 표현하는 것 보다, 밝은 영역을 더 세세하게 나누는 것이 효과적이다.
sRGBcolor = pow(linearColor, 1.0/2.2)
두 색 영역을 정확하게 변환하기는 힘들지만, 위 공식을 적용하면 비슷하게나마 변환이 가능하다.
metalView.colorPixelFormat = .bgra8Unorm_srgb
하지만 가장 정확한 방법은 renderTarget의 pixelFormat을 지정하는 것이다.
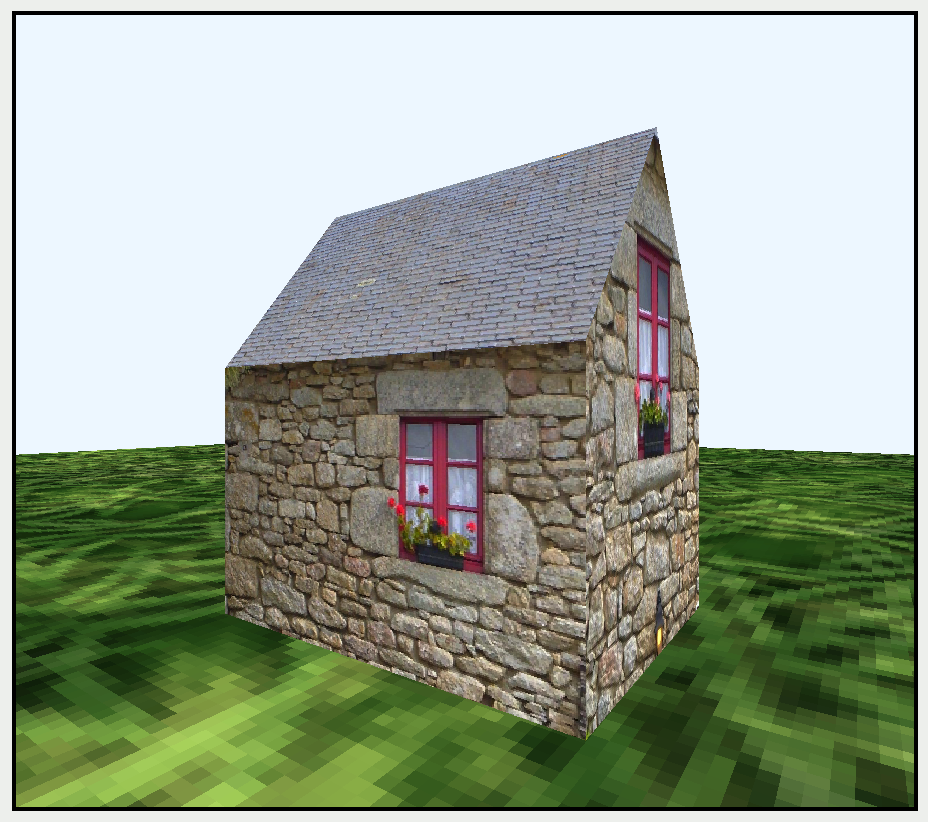
| .bgra8Unorm | .bgra8Unorm_srgb |
|---|---|
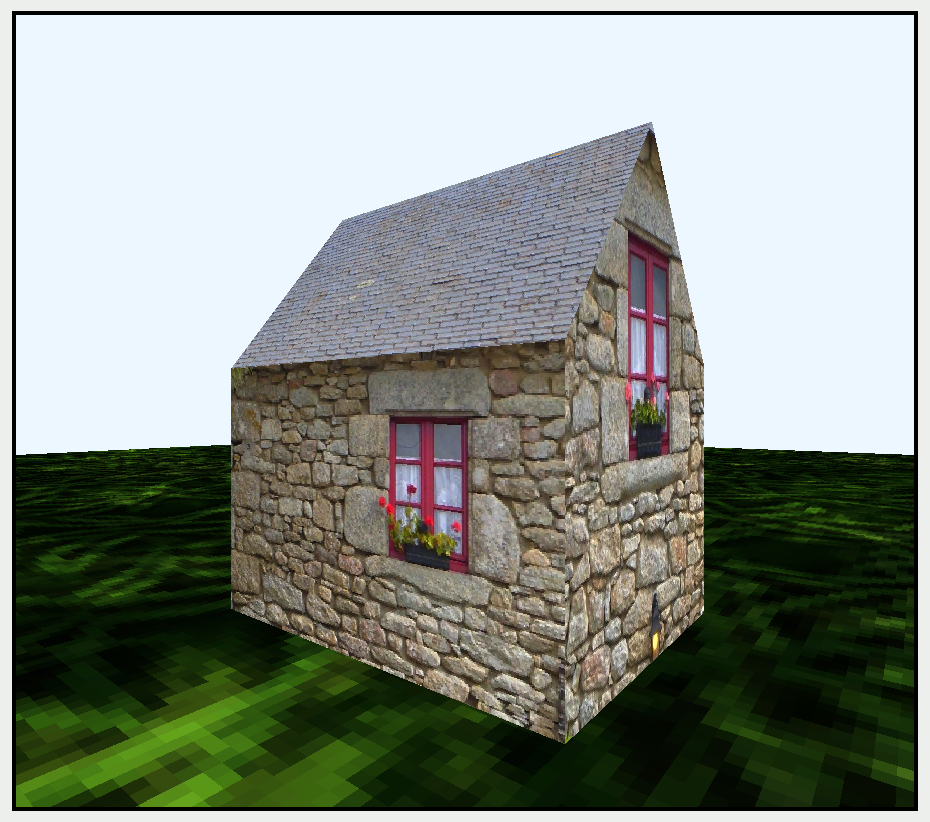 |
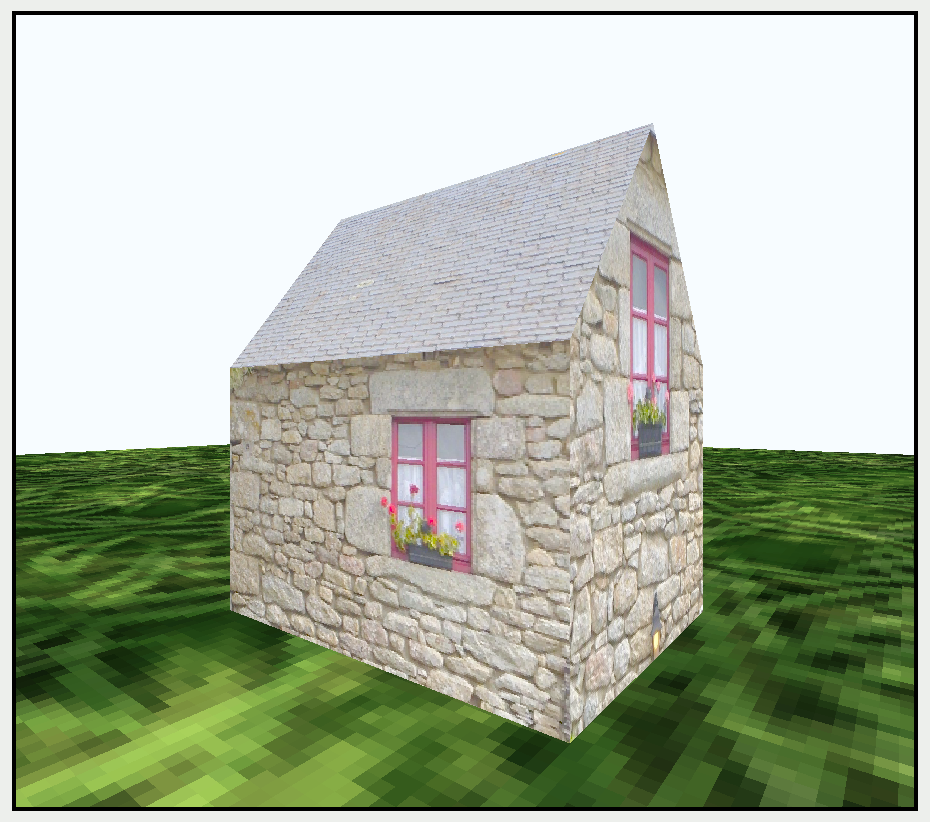 |
.bgra8Unorm: ground texture 색깔이 너무 어두움.bgra8Unorm_srgb: house texture 색깔이 너무 밝음- 두 Texture의 포맷이 다르기 때문
따라서 Texture의 color pixel format을 잘 확인해야 하는데, 가장 편하게 확인하는 방법은 Metal Debugging으로 확인하는 것이다.
Capture GPU Workload
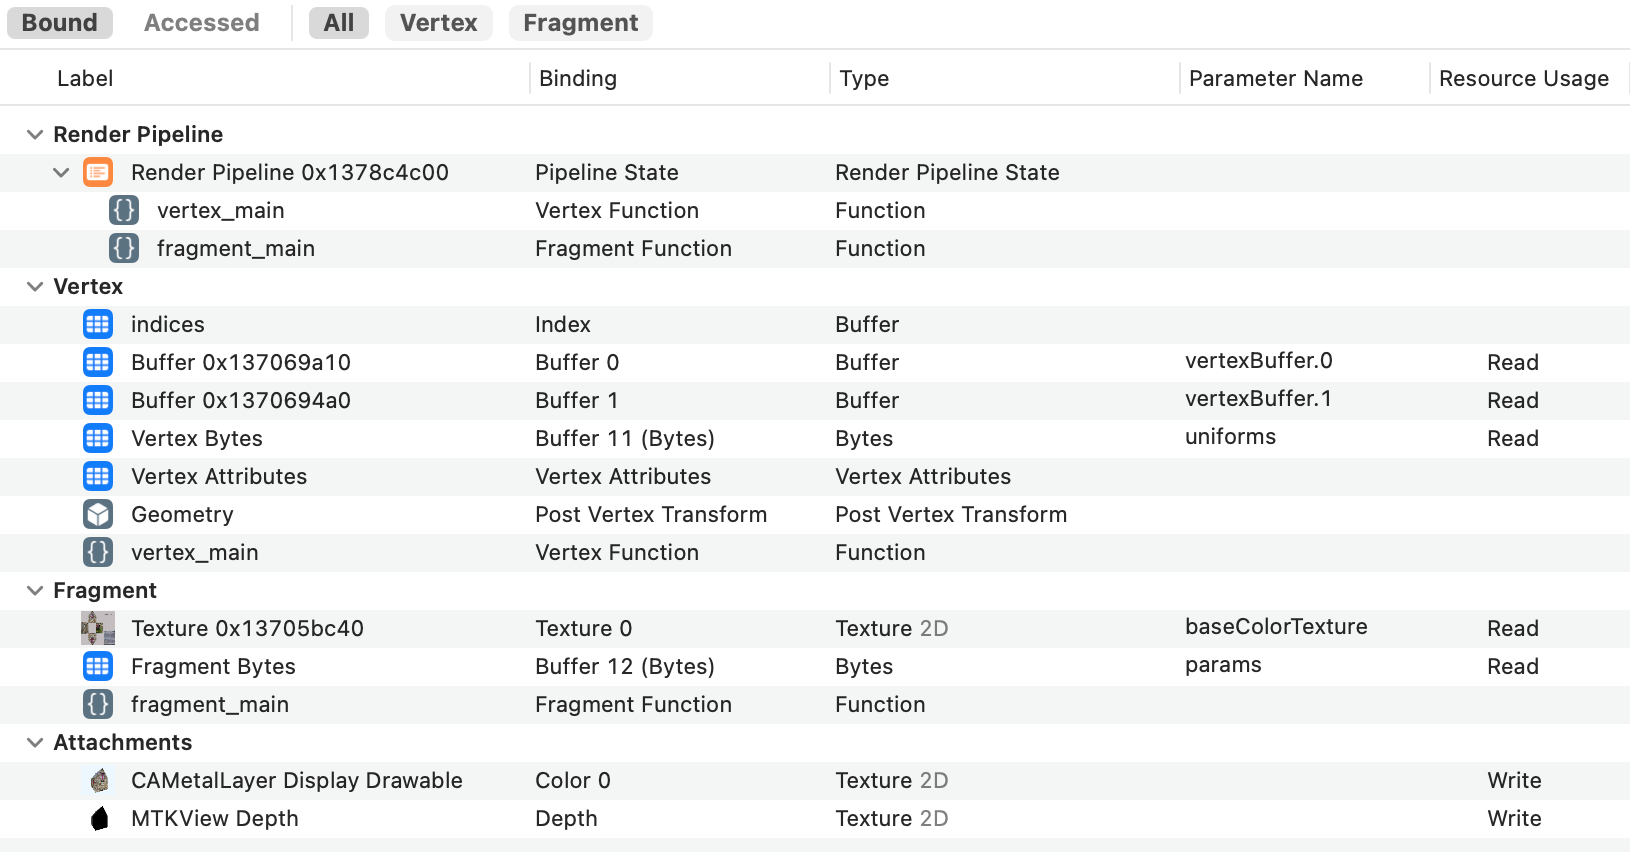
GPU Debugger를 실행시키면 Render Command Encoder별로 실행시킨 모든 명령어들을 볼 수 있다. 그 중 drawIndexedPrimitives 명령을 선택하면 위 그림과 같이 Vertex Shader, Fragment Shader에 바인딩한 모든 리소스들을 볼 수 있다. 각 리소스별로 어느 slot에 등록되었는지도 볼 수 있으며, 특정 리소스를 클릭하면 내부 데이터도 확인할 수 있다.
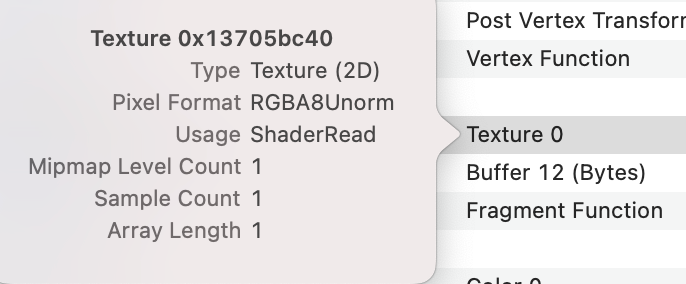
이때 Texture 리소스를 우클릭+GetInfo(or control-click) 창을 열면 Pixel Format을 확인할 수 있다. 만약 두 Texture의 Pixel Format이 다르다면 Asset Catalog를 통해 간편하게 변환할 수 있다.
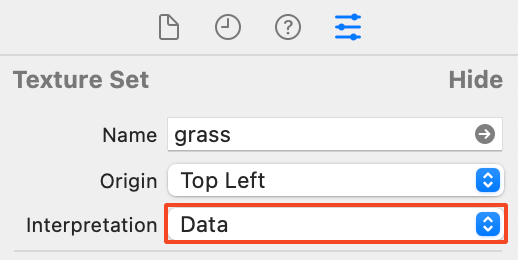
Open Textures.xcassets, click on the grass texture, and in the Attributes inspector, change the Interpretation to Data
sRGB Texture를 sRGB Buffer가 아닌 Data로 로드하면, 자동으로 linear space로 변환
| before | after |
|---|---|
 |
 |
Sampler
: Decide how your app reads your texels.
ground를 보면 Texture가 ground 크기에 맞게 늘어나 해상도가 크게 떨어지게 된다. 이러한 현상은 overSampling(하나의 texel이 여러 pixel을 커버하는 상황) 때문인데 그 정도가 크지 않은 경우에는 Filtering을 통해 어느정도 해결할 수 있다.
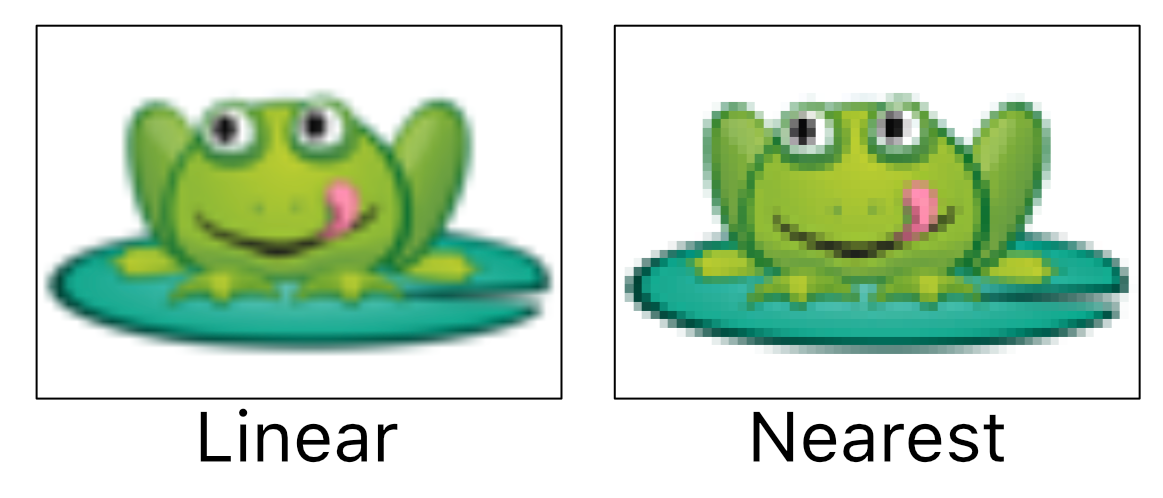
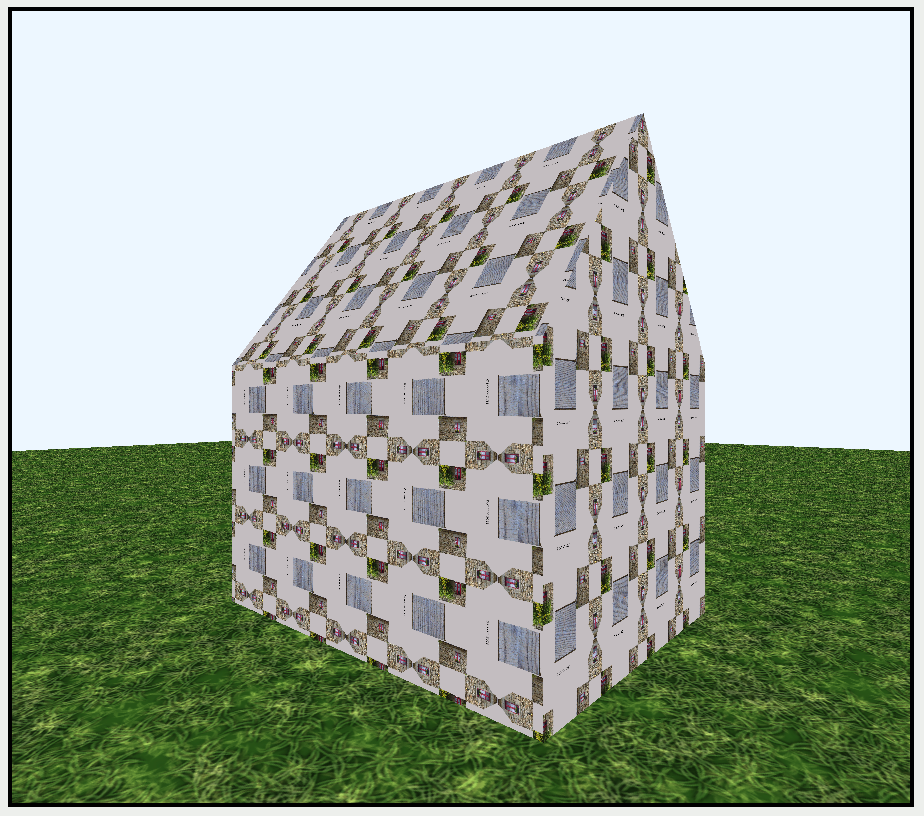
Ground의 grass texture와 같이 경계가 뚜렷하지 않은 Texture의 경우에는 Tiling 기법을 통해 quality를 크게 향상시킬 수 있다.
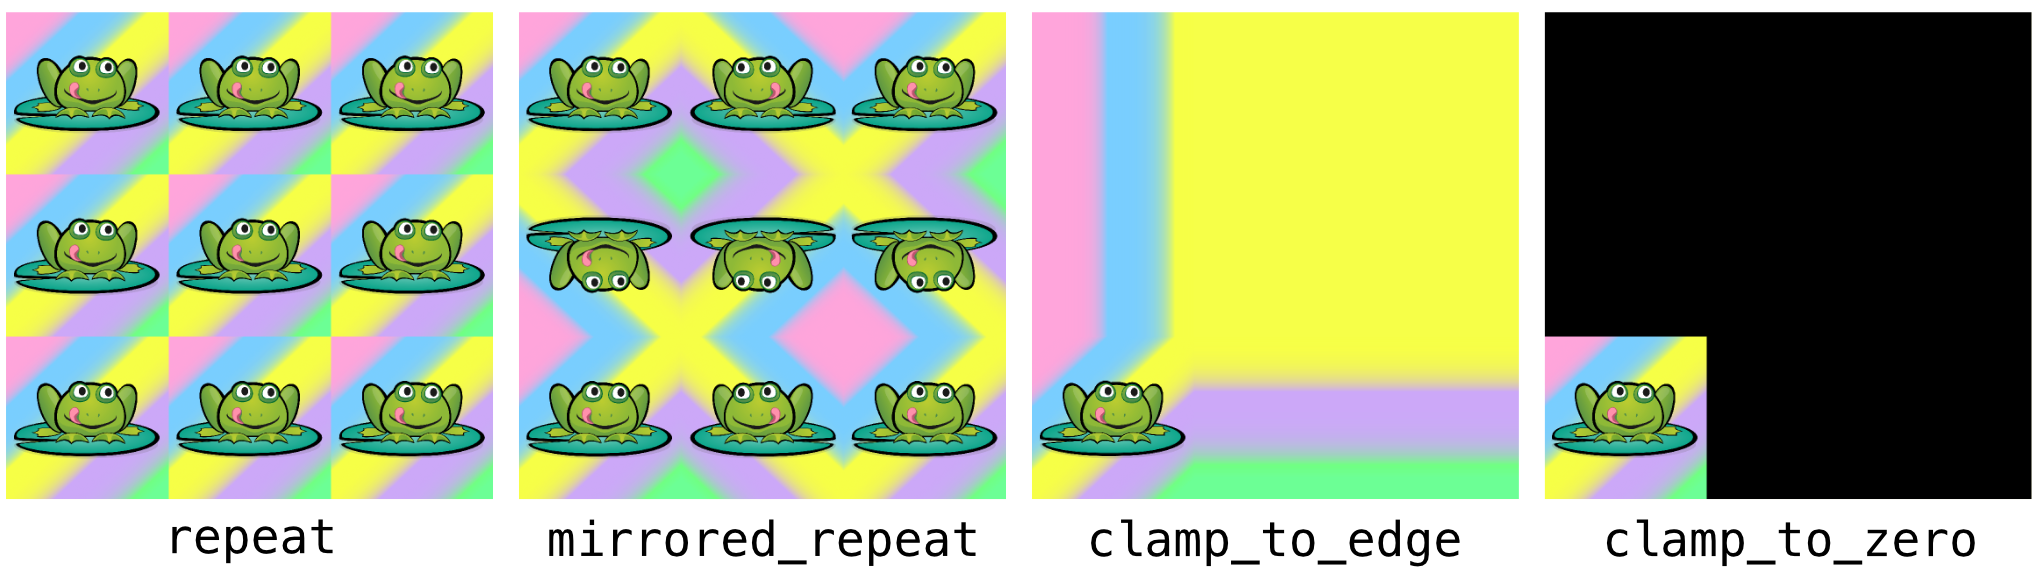
// in Fragment Function
constexpr sampler textureSampler(filter::linear, address::repeat);
float3 baseColor = baseColorTexture.sample(textureSampler, in.uv * 16).rgb;
- filter : interpolation 방식
- address : 0~1(주소)를 벗어나는 경우 어떻게 대처할 것인지
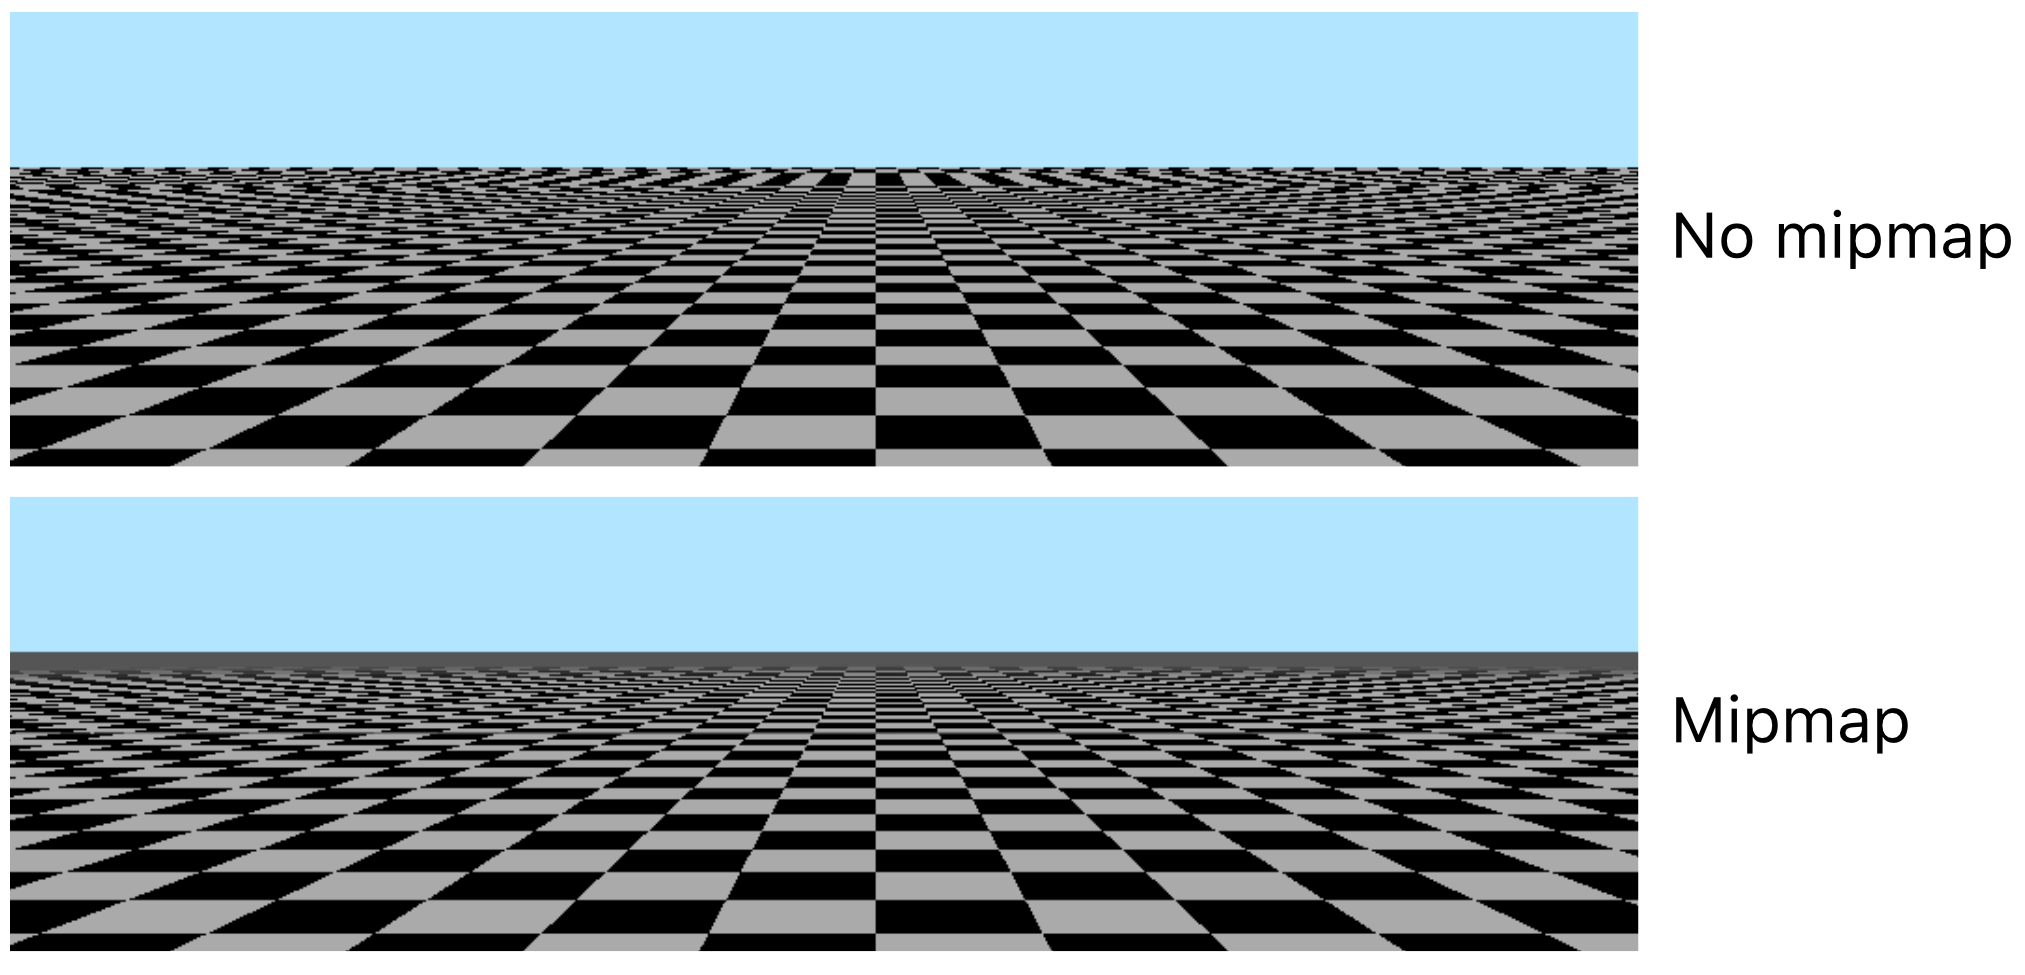
Mipmaps
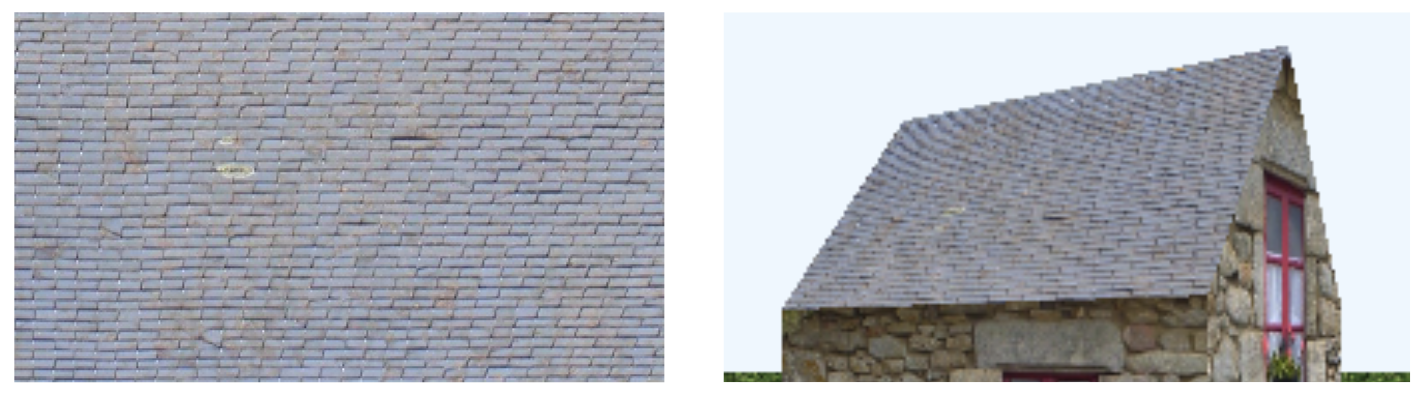
Texture의 해상도가 높다고 반드시 좋은 것은 아니다. 위 그림을 보면 한 픽셀의 여러 Texel을 커버하는 underSampling 현상이 발생하는데, 결과적으로 horizontal noise(moire artifact)가 보이게 된다.
가장 이상적인 상황은 하나의 pixel이 하나의 texel과 대응되는 것이다. 그게 힘들다면 overSampling이 훨씬 좋은 결과를 나타낸다. 그래픽스에서는 Mipmaps를 통해 해결하는데, Fragment는 화면 pixel 대비 Texture 좌표(UV)의 변화율을 통해 적절한 크기의 Texture를 선택한다.
기본적으로 사이즈를 절반씩 줄여가며 자동적으로 Mipmaps를 생성하는데, Asset Catalog를 통해 수동으로 Fixed Size Mipmaps를 설정할 수도 있다(Device별로 다른 Mipmaps 설정도 가능).
let textureLoaderOptions: [MTKTextureLoader.Option: Any] =
	[.generateMipmaps: true]

samplerDescripor.mip_filter = .linear
- Texture 로딩할 때
.generateMipmaps옵션을 통해 간편하게 Mipmaps 생성 가능 - Mipmaps를 사용하려면 Sampler에
mip_filter옵션 지정해야 함- linear / nearest / none(default)
Anisotropy
Anisotropy(이방성/비등방성) 이란 방향에 따라 물리적 특성이 달라지는 현상을 말한다. 일반적인 Texture Filtering의 경우 Texture를 정면에서 바라보는 것을 가정하고, 정사각형 모양으로 sampling한다. 하지만 실제로는 비스듬한 각도에서 Texture를 바라보는 경우가 많다. 이런 경우 화면의 한 픽셀이 Texture에서는 비스듬한 사다리꼴 영역을 차지하게 된다. 그럼에도 정사각형 texel로 sampling하게 되면 결과적으로 흐릿하게 뭉개져 보이는 현상이 발생하게 된다.
max_anisotropy(8)
Anisotropic Filtering (AF) 은 Texture를 사다리꼴 형태로 여러 번 Sampling해 color를 계산하는 기법이다. 최대 16까지 비율을 지정할 수 있으며 렌더링 속도가 떨어질 수 있으니 신중하게 사용하는 것이 좋다.
댓글 남기기