
Image-Based Lighting
카테고리: Metal
Main Reference
- Metal by Tutorials - 4th edition
Skybox
struct Skybox {
    let mesh: MTKMesh
    var skyTexture: MTLTexture?
    let pipelineState: MTLRenderPipelineState
    let depthStencilState: MTLDepthStencilState?

    init(textureName: String?) {
        let allocator =
        MTKMeshBufferAllocator(device: Renderer.device)
        let cube = MDLMesh(
            boxWithExtent: [1, 1, 1],
            segments: [1, 1, 1],
            inwardNormals: true,
            geometryType: .triangles,
            allocator: allocator)
        do {
            mesh = try MTKMesh(
                mesh: cube, device: Renderer.device)
        } catch {
            fatalError("failed to create skybox mesh")
        }

        pipelineState = PipelineStates.createSkyboxPSO(vertexDescriptor: MTKMetalVertexDescriptorFromModelIO(cube.vertexDescriptor))
        depthStencilState = Self.buildDepthStencilState()
    }

	static func buildDepthStencilState() -> MTLDepthStencilState? {
        let descriptor = MTLDepthStencilDescriptor()
        descriptor.depthCompareFunction = .lessEqual
        descriptor.isDepthWriteEnabled = true
        return Renderer.device.makeDepthStencilState(
            descriptor: descriptor)
    }

	func render(encoder: MTLRenderCommandEncoder,
		        uniforms: Uniforms) {
		// ..

		var uniforms = uniforms
		uniforms.viewMatrix.columns.3 = [0, 0, 0, 1]
    }
  }
- Cube mesh를 만들 때
inwardNormals : true옵션 지정해야 정상적으로 렌더링 됨 - Depth Testing에서
compareFunction = .lessEqual옵션 지정- skybox는 항상 모든 object들 중 가장 뒤에 그려져야 하기 때문에 NDC공간에서 1.0 깊이 값을 가짐
- Depth Buffer의 초기값은 1.0이기 때문에 lessEqual로 설정해야 skybox fragment가 통과함
- PSO도 들고있고, render 함수도 들고있고. 일반적인 model과는 완전히 다른 파이프라인을 가짐
- depth testing 방식(pso)도 다르고, shader function도 다르고, uniform도 다르고 하니까 별도로 관리하는게 편리
- camera의 position이 바뀌면 사실은 scene 전체가 카메라를 중심으로 이동하는 것.
- 이때 skybox의 위치는 변하면 안되기 때문에
viewMatrix.columns.3를 0으로 초기화
- 이때 skybox의 위치는 변하면 안되기 때문에
- RenderPass에서 render 순서는 transparency object render 직전
- opaque pass에서 마지막에 render 해야 depth test를 통해 중복된 pixel 계산이 최소화
vertex VertexOut vertex_skybox(const VertexIn in [[stage_in]],
                               constant Uniforms &uniforms [[buffer(UniformsBuffer)]])
{
    VertexOut out;
    float4x4 vp = uniforms.projectionMatrix * uniforms.viewMatrix;
    out.position = (vp * in.position).xyww;
    return out;
}
- ndc에서 항상 1.0의 depth 값을 하기 위해 swizzled
xyzwposition toxyww
Cube Textures
Cube textures consist of six 2D-textures. You sample the textures with a 3D vector.
The easiest way to load a cube texture into Metal is to use Model I/O’s MDLTexture initializer. When creating cube textures, you can arrange the images in various comnbinations.
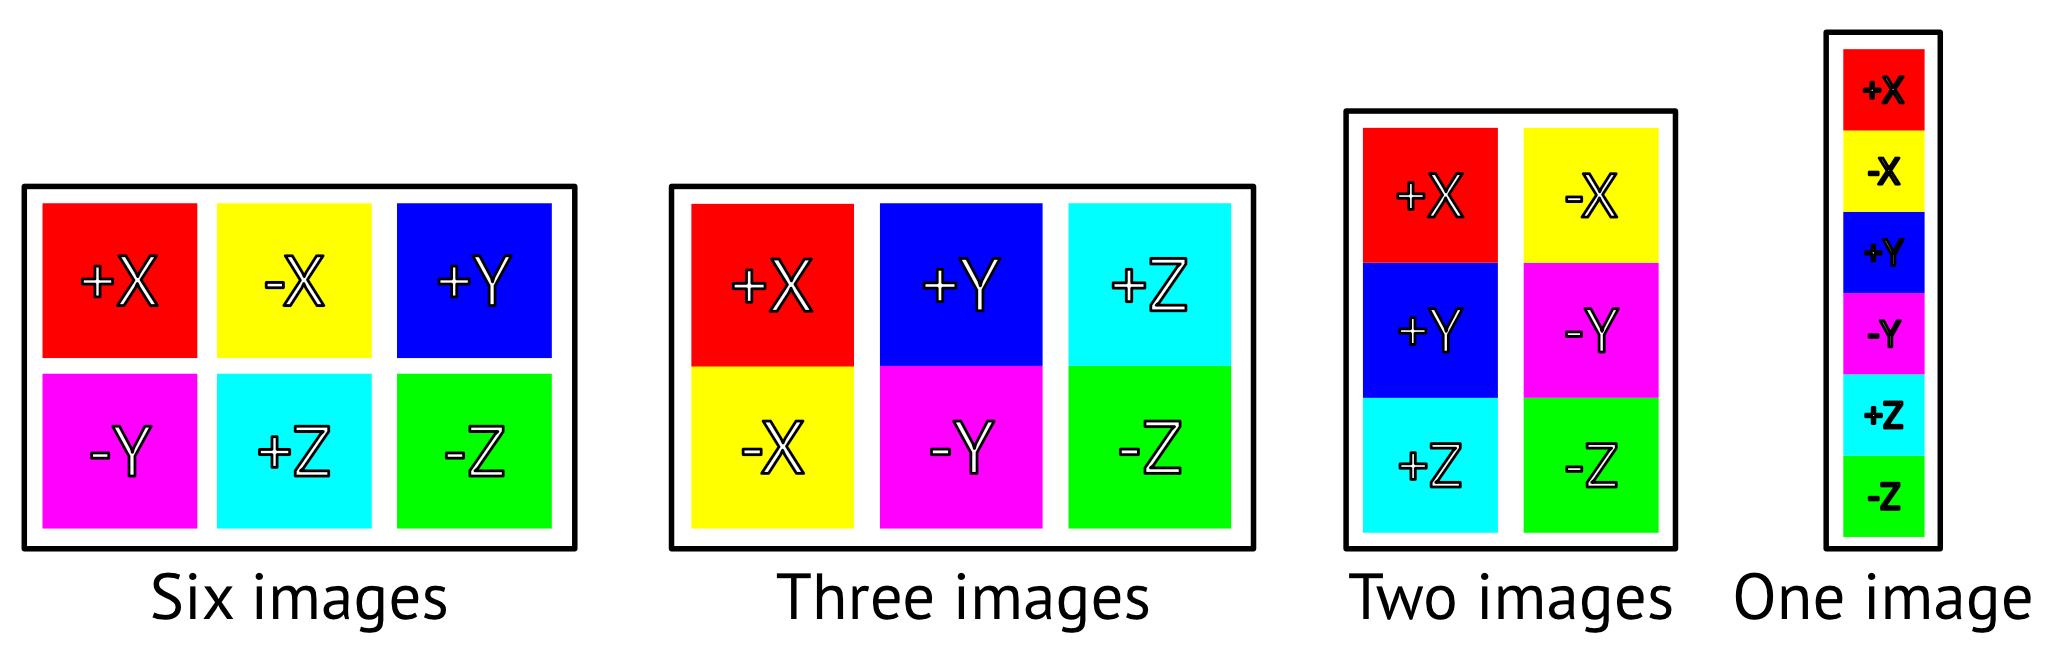
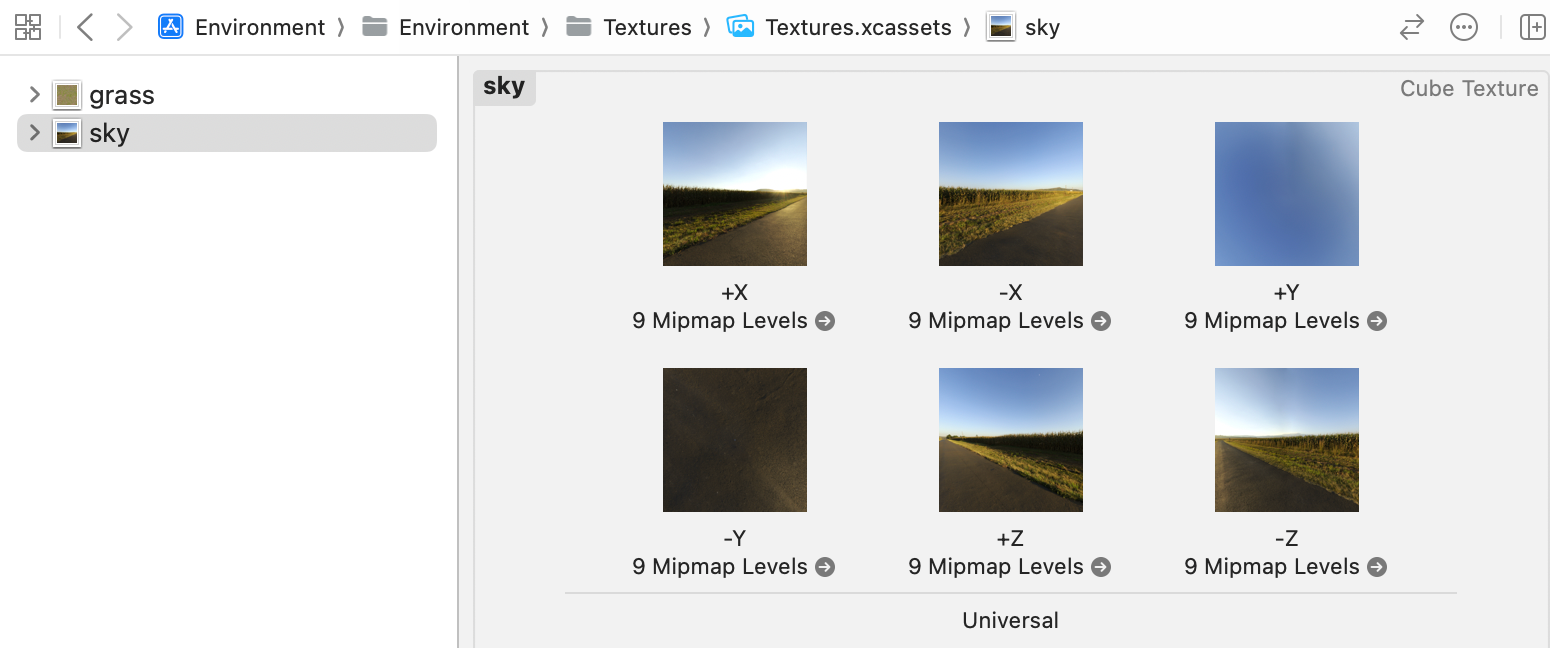
Alternatively, you can create a cube texutre in an asset catalog and load the six images.
func loadGeneratedSkyboxTexture(dimensions: SIMD2<Int32>) -> MTLTexture? {
	var texture: MTLTexture?
	let skyTexture = MDLSkyCubeTexture(
		name: "sky",
		channelEncoding: .float16,
		textureDimensions: dimensions,
		turbidity: skySettings.turbidity,
		sunElevation: skySettings.sunElevation,
		upperAtmosphereScattering: skySettings.upperAtmosphereScattering,
		groundAlbedo: skySettings.groundAlbedo)
	do {
		let textureLoader =
			MTKTextureLoader(device: Renderer.device)
			texture = try textureLoader.newTexture(
			texture: skyTexture,
			options: nil)
	} catch {
		print(error.localizedDescription)
	}
	return texture
}
MDLSkyCubeTexture can do creating a procedually generated sky texture
turbidity: 안개 (탁도)sunElevation: 태양 고도upperAtmosphereScattering: 대기 산란 (하늘의 파란색 짙은 강도)groundAlbedo: 지표면 반사율 (지표면 위쪽의 밝기)

In cube textures, instead of using a uv coordinate, you use a 3D vector coordinates. Conveniently, even though the skybox’s far top-left vector position is [-0.5, 0.5, 0.5], it still lies on the same vector to [-1, 1, 1]. So you can use the skybox’s vertex position for the texture coordinates.
struct VertexOut {
    float4 position [[position]];
    float3 textureCoordinates;
};

vertex VertexOut vertex_skybox(const VertexIn in [[stage_in]],
                               constant Uniforms &uniforms [[buffer(UniformsBuffer)]])
{
    VertexOut out;
    float4x4 vp = uniforms.projectionMatrix * uniforms.viewMatrix;
    out.position = (vp * in.position).xyww;
    out.textureCoordinates = in.position.xyz;

    return out;
}

fragment half4 fragment_skybox(VertexOut in [[stage_in]],
                               texturecube<half> cubeTexture [[texture(SkyboxTexture)]])
{
    constexpr sampler default_sampler(filter::linear);
    half4 color = cubeTexture.sample(default_sampler,
                                     in.textureCoordinates);
    return color;
}
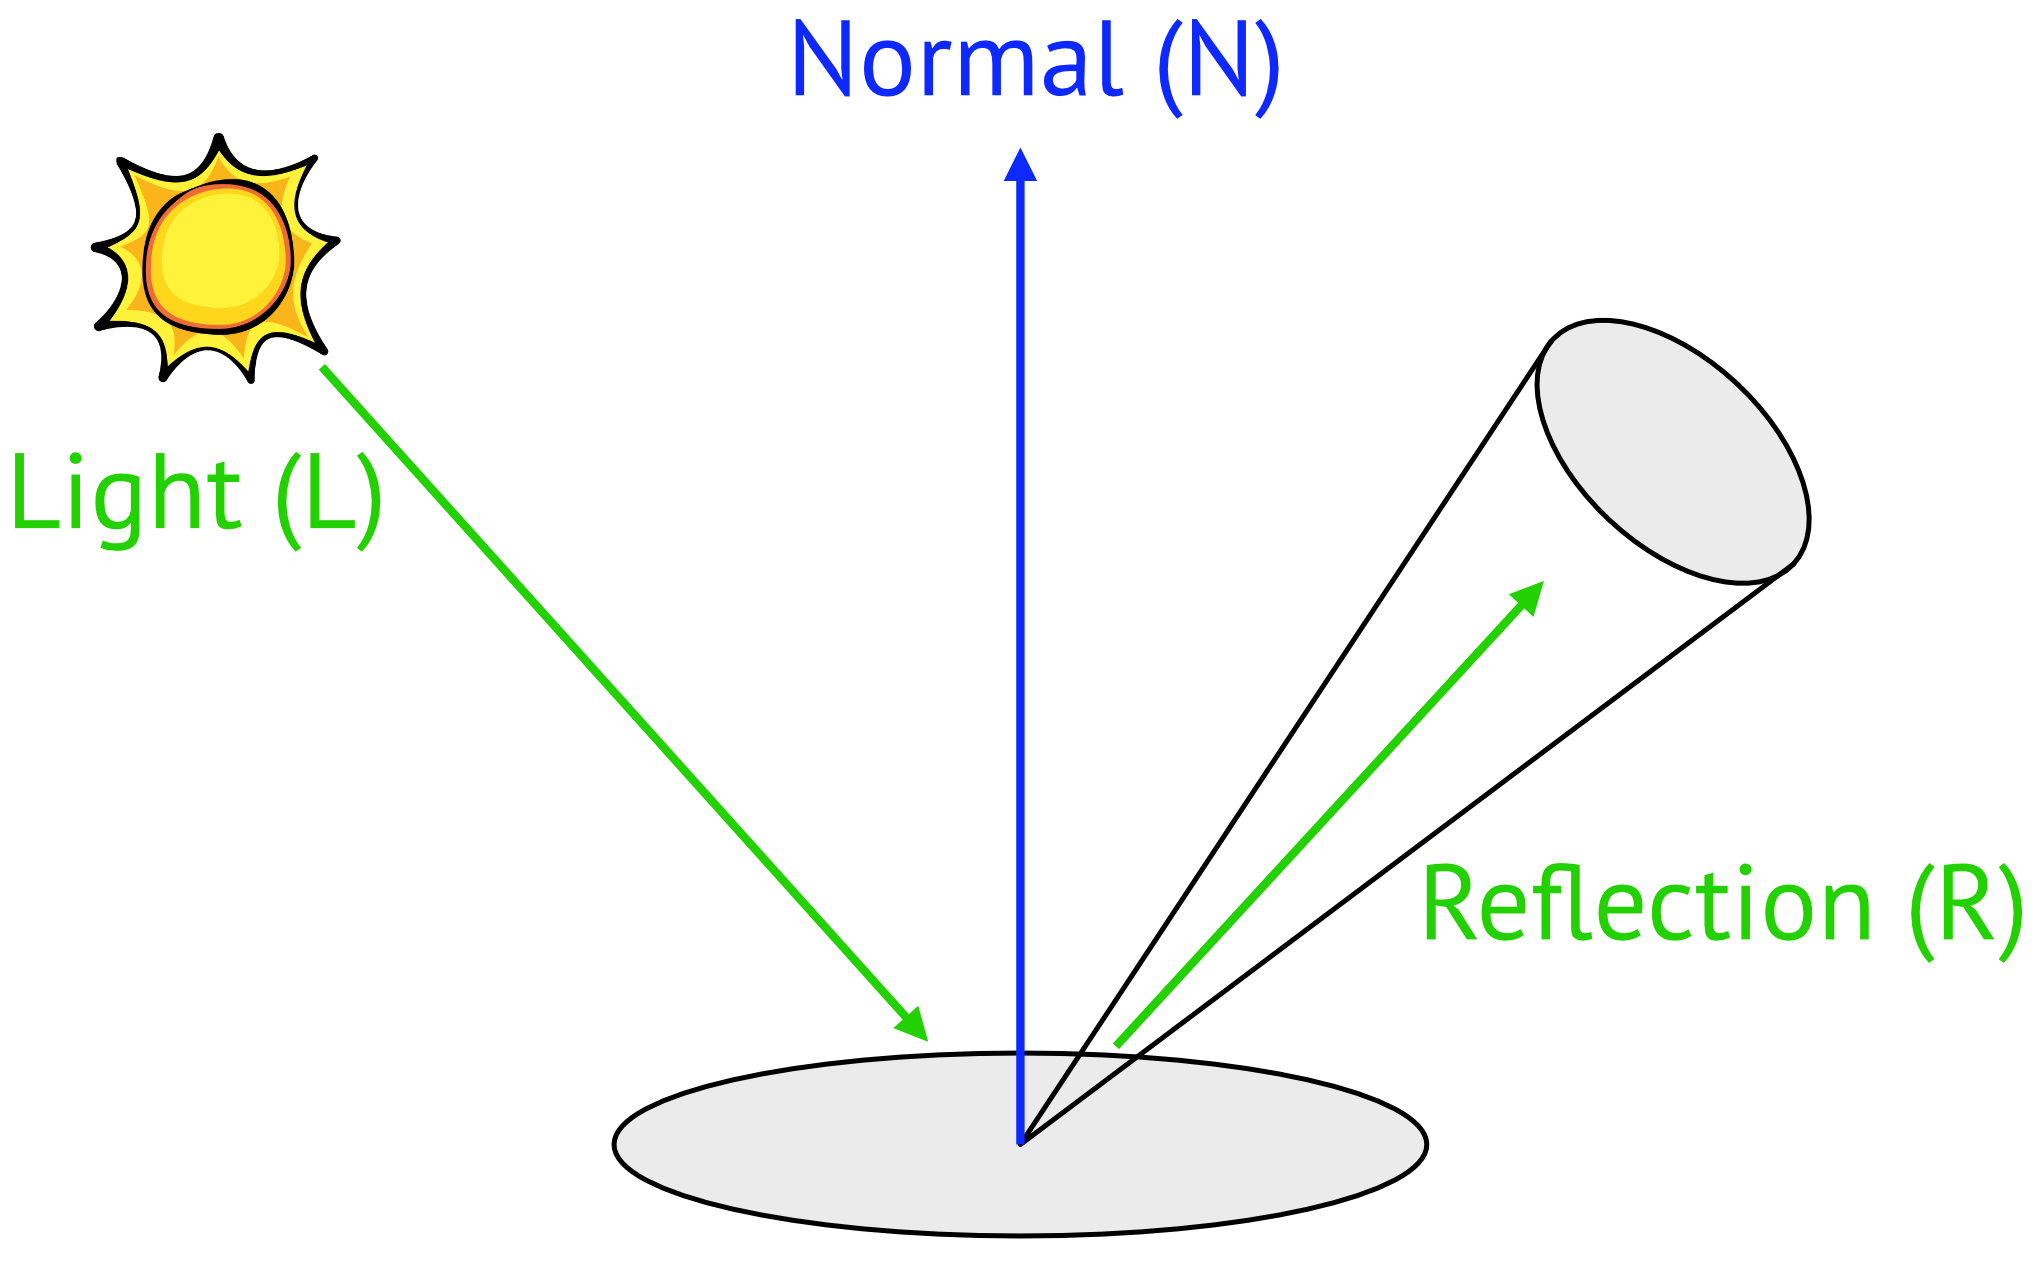
Reflection

Now that you have something to reflect, you can easily implement reflection of the sky onto the car. When rendering the car, all you have to do is take the camera view direction, reflect it about the surface normal, and sample the skycube along the reflected vector for the fragment color for the car.
// in skybox struct
func update(encoder: MTLRenderCommandEncoder) {
	encoder.setFragmentTexture(skyTexture,
							   index: SkyboxTexture.index)
}

// in fragment function (fragment_IBL)
float4 color = float4(material.baseColor, 1);

float3 viewDirection = in.worldPosition.xyz - params.cameraPosition;
viewDirection = normalize(viewDirection);
float3 textureCoordinates = reflect(viewDirection, normal);

constexpr sampler defaultSampler(filter::linear);
color = skybox.sample(defaultSampler, textureCoordinates);
float4 copper = float4(0.86, 0.7, 0.48, 1);
color = color * copper;
- 정확한 sampling을 위해 skybox texutre는 매 프레임 업데이트하도록 변경
- viewDirection 계산한 다음에 reflect 함수를 통해 textureCoord 계산
- skybox에서 sampling. reflection 결과를 확인하기 위해 구리 material로 shading
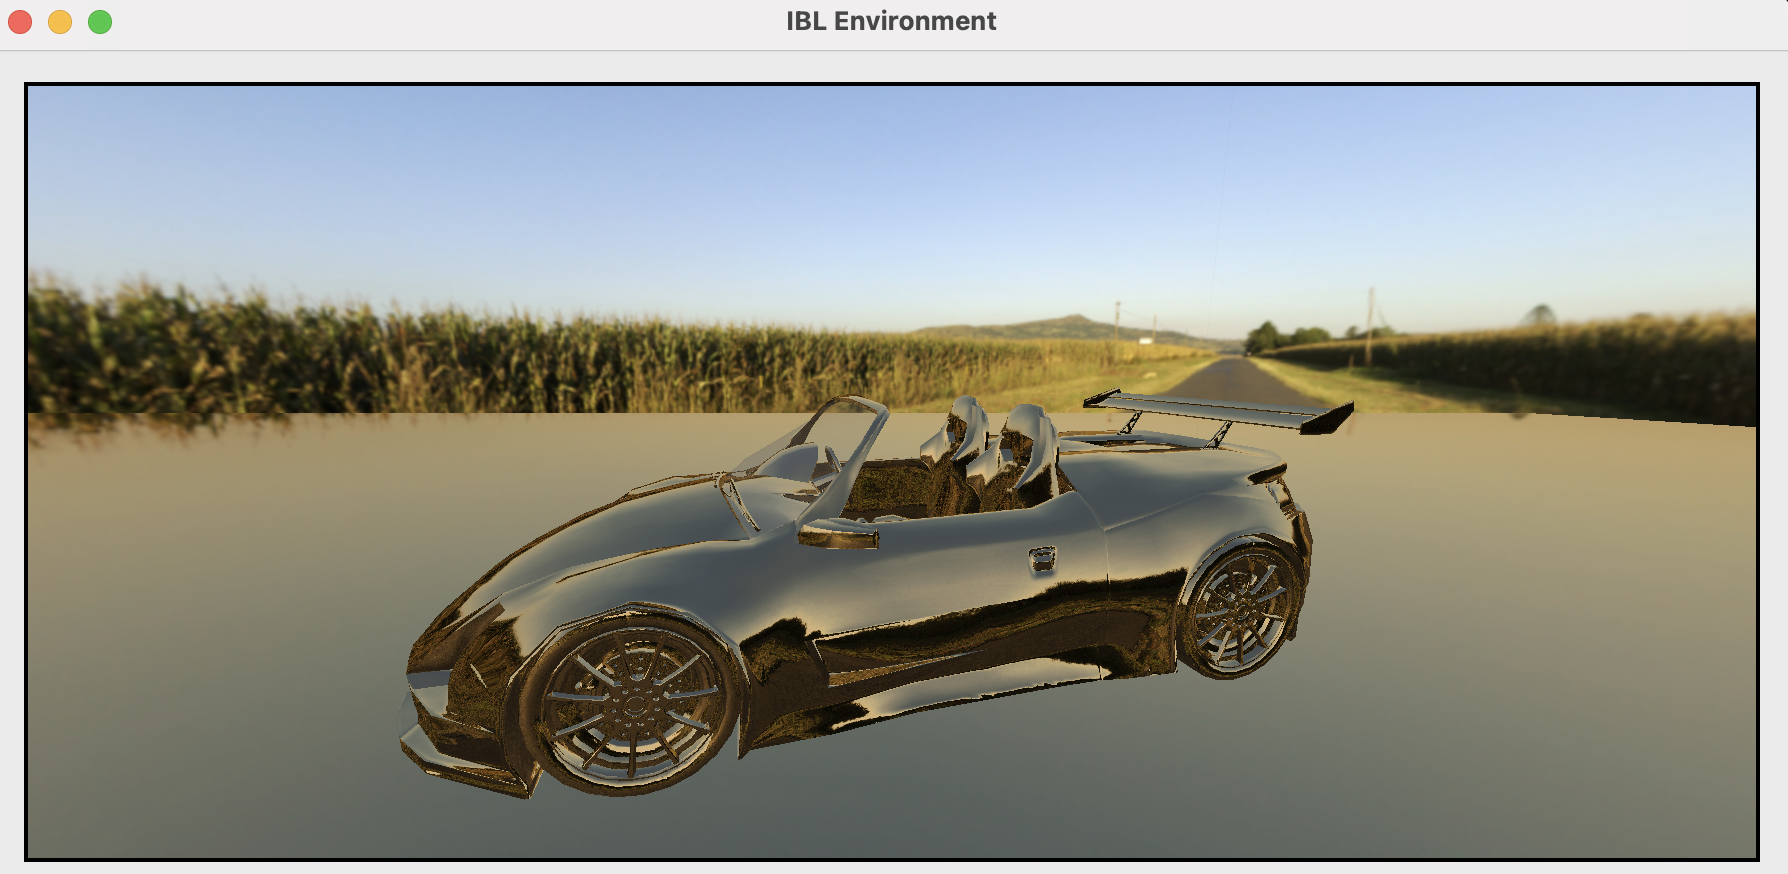
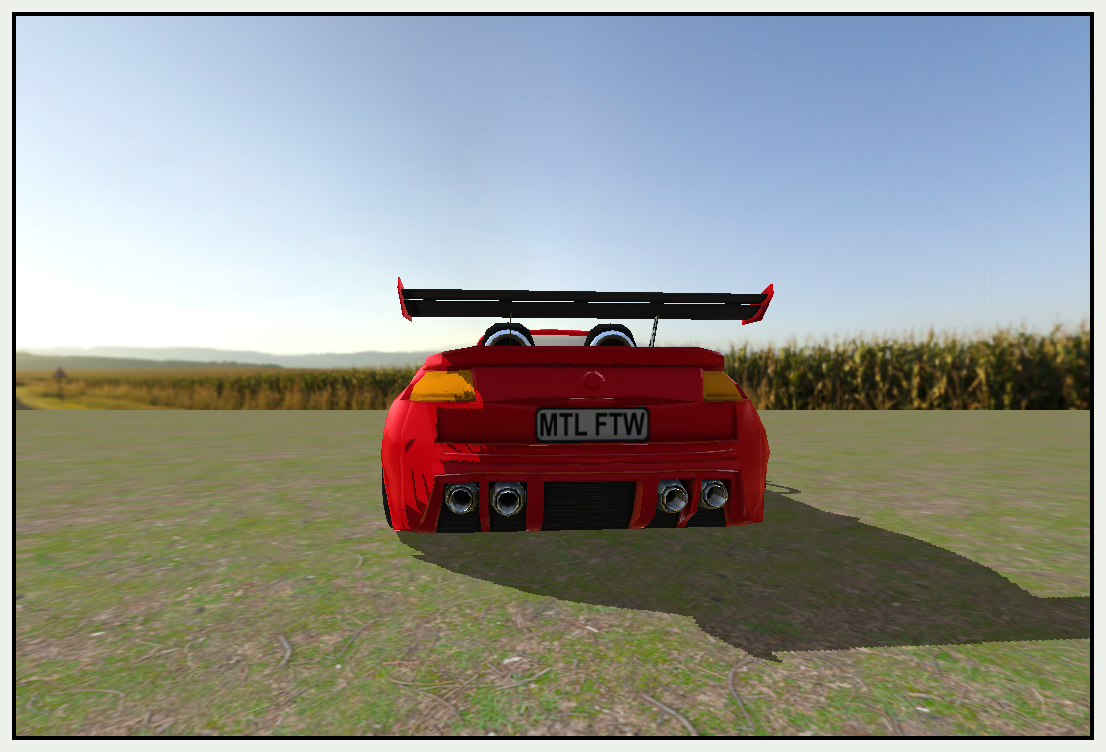
Image-Based Lighting
When you render a car with skybox, you want to render a car as if it belongs in the scene with environment lighting. Image-Based Lighting(IBL) is one way of dealing with this problem.
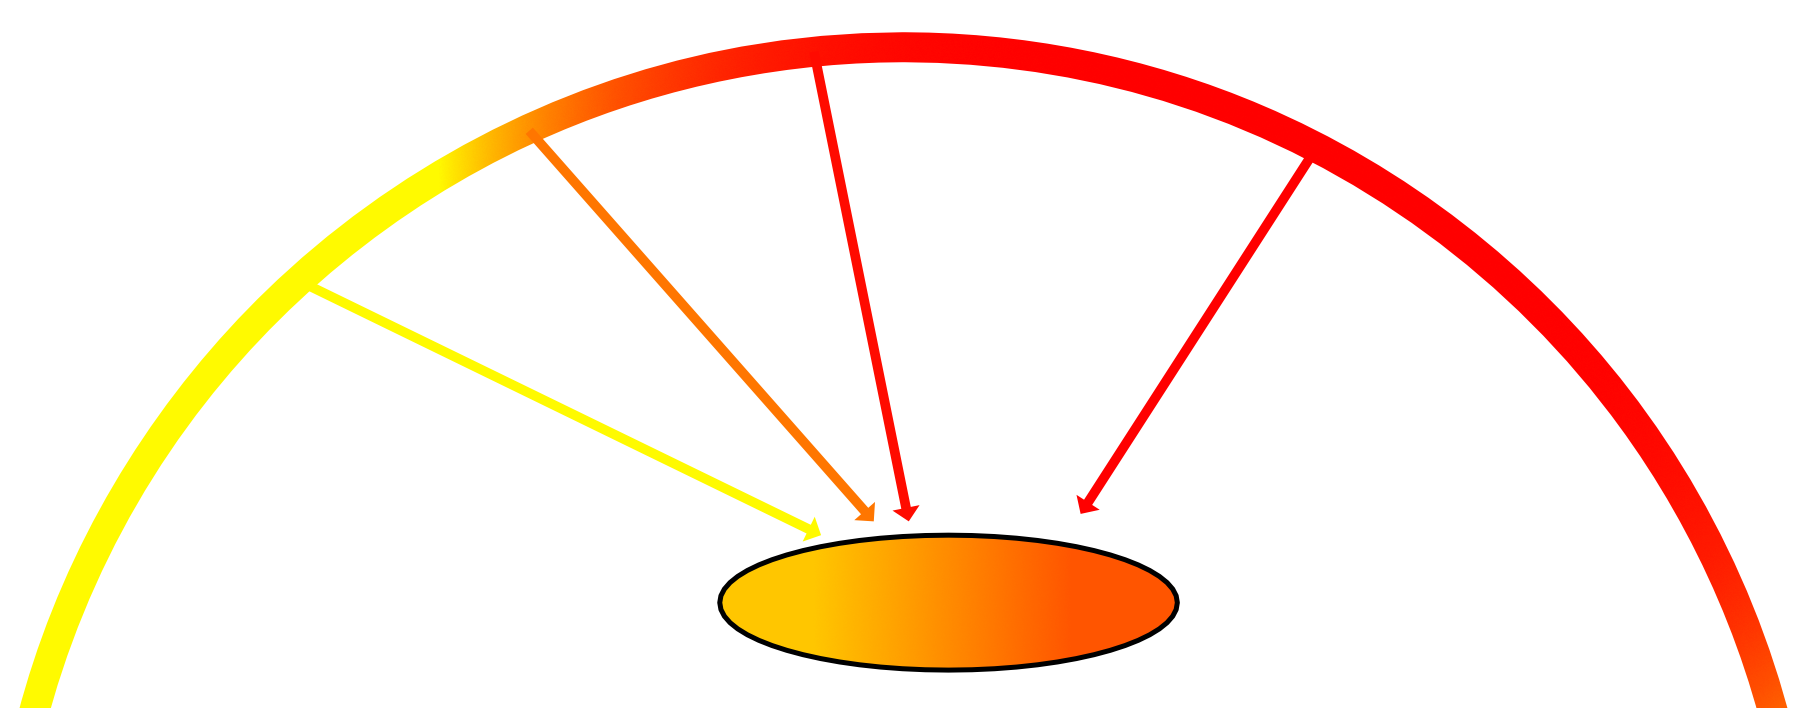
Light comes from all around us. Sunlight bounces around and colors reflect. When rendering an object, you should take into account the color of the light coming from every direction. This is somewhat of an impossible task, but you can use convolution to compute a cube map called an irradiance map from which you can extract lighting information.
// in skybox struct..
mutating func loadIrradianceMap() {
	guard
		let skyCube = MDLTexture(cubeWithImagesNamed: ["cube-sky.png"])
	else {
		return
	}

	let irradiance = MDLTexture.irradianceTextureCube(
			with: skyCube,
			name: nil,
			dimensions: [64, 64],
			roughness: 0.6)

	let loader = MTKTextureLoader(device: Renderer.device)
	do {
		diffuseTexture = try loader.newTexture(
			texture: irradiance,
			options: nil)
	} catch {
		fatalError(error.localizedDescription)
	}
}
- Model I/O를 통해
irradiance map간편하게 생성- asset catalog 사용 못함
- 사실 image 파일로 미리 생성해두고 쓰는게 훨씬 효율적

// in fragment function..
float4 diffuse = skyboxDiffuse.sample(textureSampler, normal);
color = diffuse * float4(material.baseColor, 1);
Diffuse value doesn’t depend on the angle of view, so you sample the diffuse texture using the surface normal.
Specular Reflection
Specular Reflection은 light direction에 의존하므로 diffuse reflection에 비해 복잡하고 실시간으로 계산해야 한다는 문제도 있지만, 더 큰 문제는 material의 roughness 값에 의존한다는 것이다.

이를 해결하기 위해 roughness 값에 따라 미리 여러 단계로 흐릿하게 만들어 mipmap에 저장하는 방식을 사용한다. 이렇게 하면 fragment function은 material의 roughness 값에 따라 적절한 mipmap texture를 가져다 쓰면 된다.
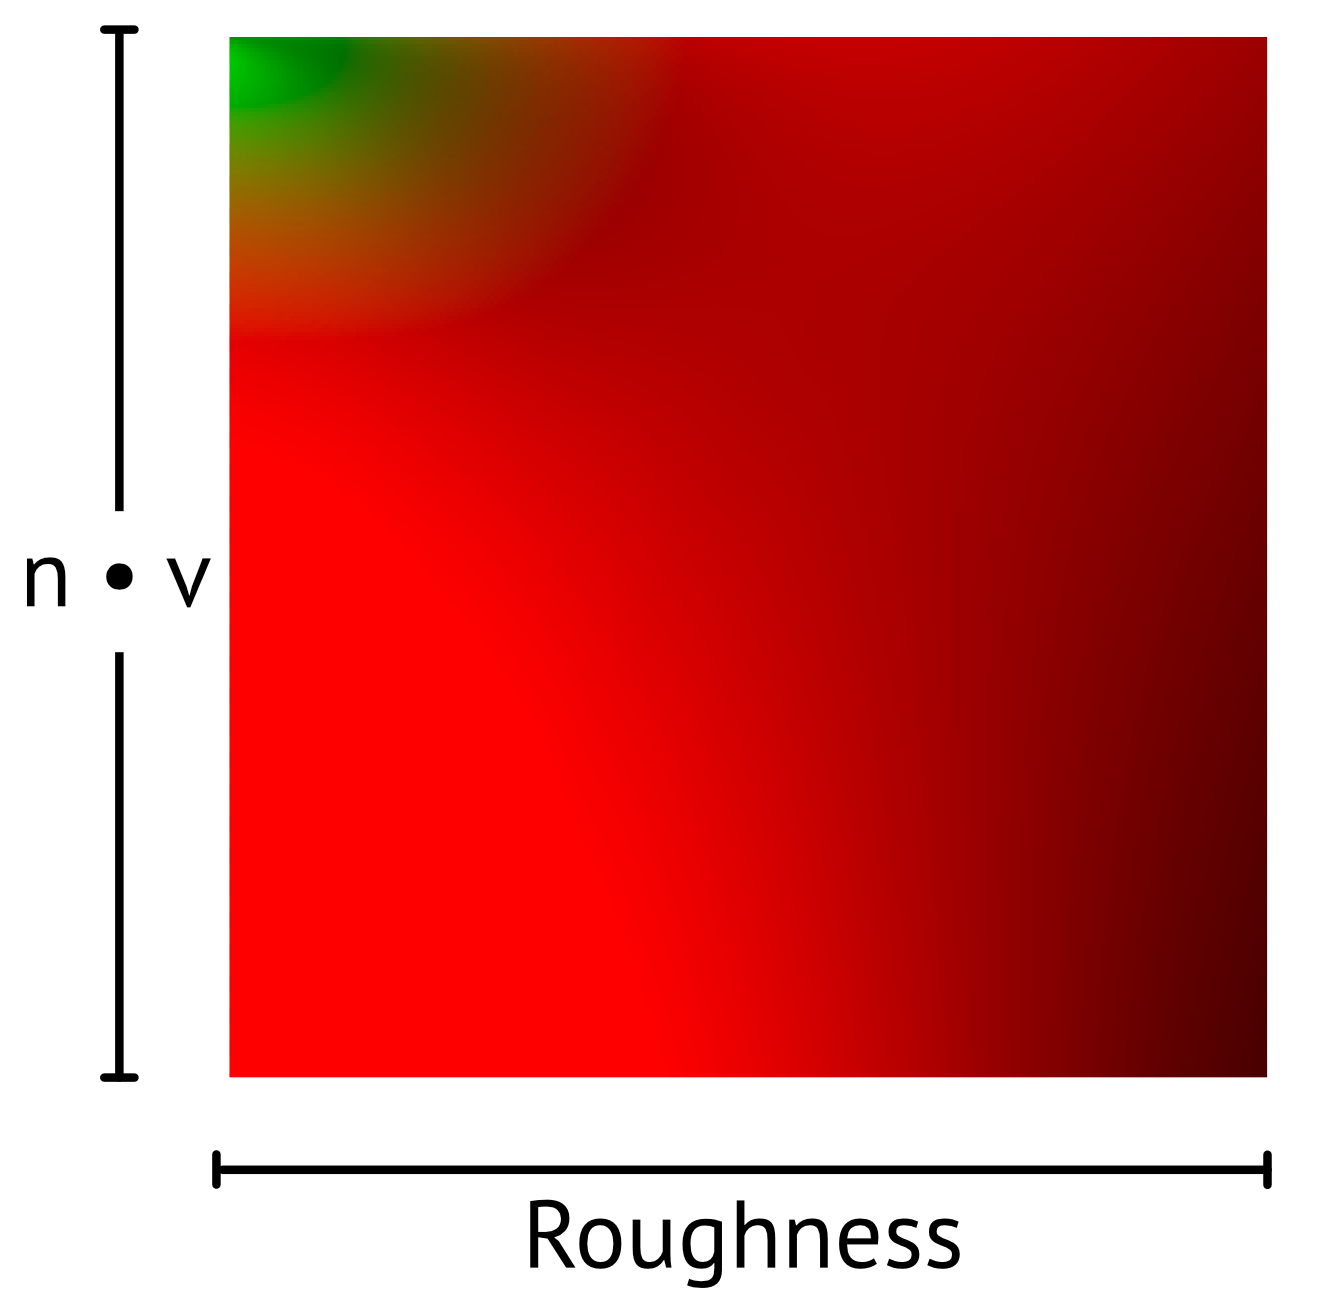
BRDF Look-Up Table
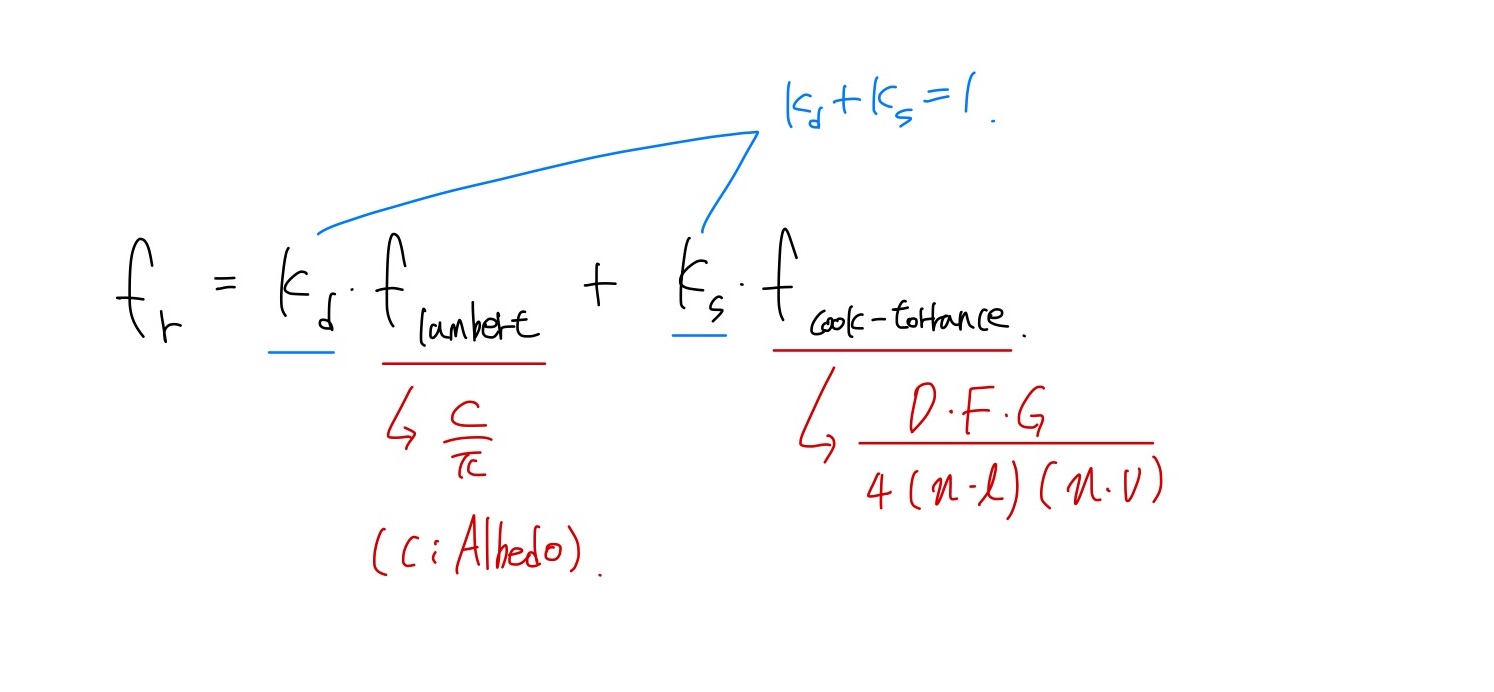
Bidirectional Reflectance Distribution Function (BRDF)
- f(l,v) = f(v,l)
- 에너지 보존 법칙 성립 (Blinn Phong은 만족x)
- Diffuse Term + Specular Term
- Specular : Cook-Torrance Model
- D (Normal Distribution) : normal 방향과 일치하는 micro-facet의 비율
- F (Fresnel) : normal과의 각도에 따라 바뀌는 반사율 반영
- G (Geometry) : 울퉁불퉁한 표면에 의한 self-shadowing 성질 반영
BRDF는 실시간으로 계산하기에 비싼 연산이다. 함수에 영향을 미치는 변수를 살펴보면 l,v 사이의 각도, roughness 로 정리할 수 있다. 따라서 두 채널을 기준으로 BRDF 계산을 미리 수행해 2D Texture (Look-Up Table)에 저장해 샘플링 하는 방식을 사용한다. 이때 BRDF는 외부 툴로 생성할 수도 있고, 본 예제에서는 compute shader kernel을 통해 직접 생성 한다.
float4 diffuse = skyboxDiffuse.sample(textureSampler, normal);
diffuse = mix(pow(diffuse, 0.2), diffuse, material.metallic);
diffuse *= calculateShadow(in.shadowPosition, shadowTexture);
color = diffuse * float4(material.baseColor, 1);

constexpr sampler s(filter::linear, mip_filter::linear);
float3 prefilteredColor = skybox.sample(
				s,
				textureCoordinates,
				level(material.roughness * 10)).rgb;

float nDotV = saturate(dot(normal, -viewDirection));
float2 envBRDF = brdfLut.sample(s, float2(material.roughness, nDotV)).rg;

float3 f0 = mix(0.04, material.baseColor.rgb, material.metallic);
float3 specularIBL = f0 * envBRDF.r + envBRDF.g;

float3 specular = prefilteredColor * specularIBL;
color += float4(specular, 1);

color *= material.ambientOcclusion;

return color;
- non-metals object의 diffuse값 감소
- 일반적으로 비금속 물체들은 빛을 흡수하기때문에 albedo보다 어둡다고 함..
- 전체적인 색감에 따라 더 어둡게 또는 밝게 조정
- skybox texture에서 sampling한 값을 받아올 때, roughness로 mipmap 레벨 결정
- brdf textrue를 이용해 specular 계산
- 이때 fresnel 계수의 경우 비금속 재질이 4% 값을 가진다고 함.
- 이를 보정하기 위해 0.04와 mix 연산
- AO Texture를 통해 모델 내 표면의 그림자 보정
Q) sky box는 NDC에서 z=1 이니까 항상 가장 먼 곳에 렌더링 됨. 그런데 왜 mipmap texture를 갖는거지?
댓글 남기기